# Team accounts setup

A team account is **a shared workspace** **where multiple users can collaborate**. This setup is ideal for companies and teams using GetBlock services.

**Key benefits:**

* **Organized collaboration:** Work together on company resources.
* **Enhanced security:** Role-based access limits each member to only the features they need.
* **Efficient management:** Easily switch between personal and team accounts.

A **team account user** is a regular GetBlock user. When invited to a team, they can work on company resources, manage service plans or team settings, provided the corresponding permissions are granted.

***

### Creating a team account on GetBlock

This part covers a step-by-step guide to setting up your team workspace.

1. Sign in to your GetBlock account. If you don’t have a user account yet, create one following [this guide](/getting-started/how-to-set-up-an-account.md).
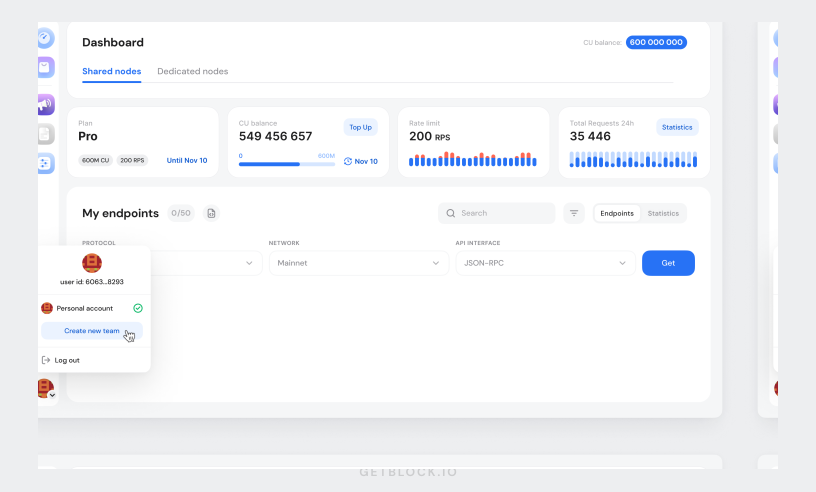
2. Click on the **profile icon** in the bottom-left corner of the sidebar. Select "**Create new team**" from the dropdown menu.

<figure><img src="/files/kItmybm0mNkclcd2Qj5R" alt="How to create a team account on GetBlock"><figcaption></figcaption></figure>

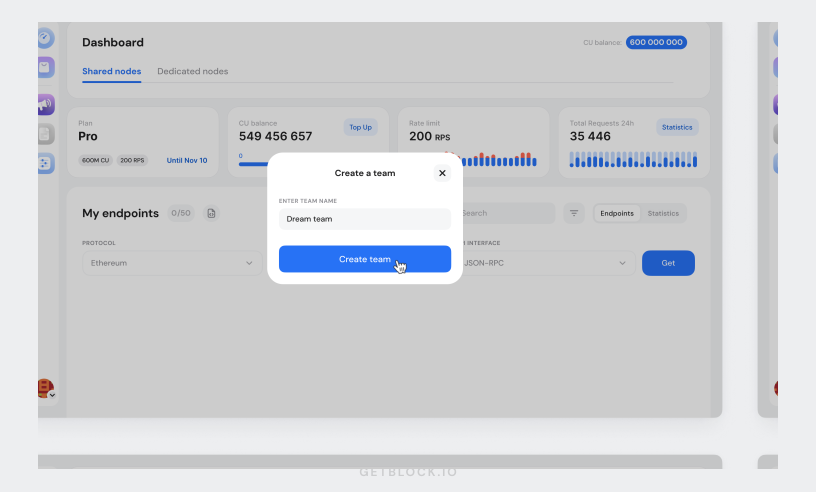
3. A popup window will appear. Assign a team name and click the "**Create team**" button.

<figure><img src="/files/8geS11qm2WUt1FAm4nns" alt="Creating an enterprise account with RPC node provider GetBlock"><figcaption></figcaption></figure>

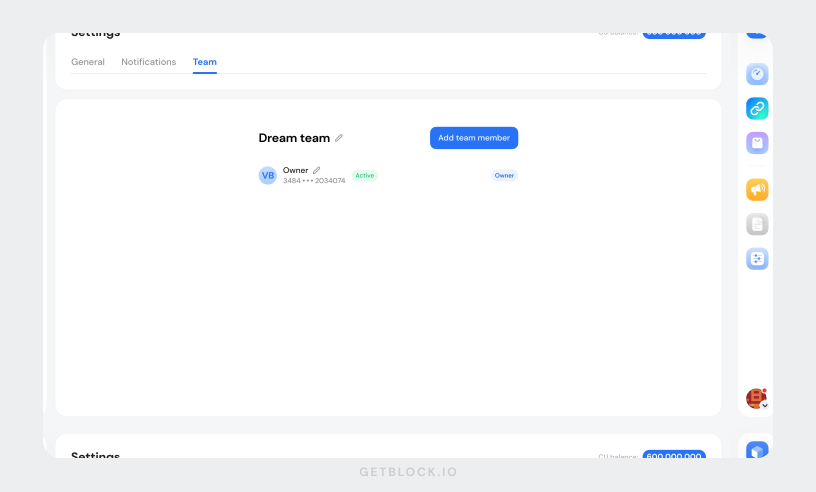
3. Once the space is created, navigate to **Account Settings** > **Team** to manage team settings or add teammates.

<figure><img src="/files/W3UBGBeVGbN7494ZYWrx" alt="Collaboration feature for GetBlock enterprise users"><figcaption></figcaption></figure>

***

### Adding teammates

The creator of the team account controls who gets invited and manages user roles.

{% hint style="warning" %}
**Limits on GetBlock team accounts:**

* Each user can create up to **3 teams**.
* A user can be invited to an **unlimited number of teams**.
* One team can have a maximum of **30 users.**
  {% endhint %}

You can invite team members to join your team account using either their email address or GetBlock User ID.

* **If the teammate has a GetBlock account**: You can invite them using their **ID**. Since they are already registered, they just need to accept the invitation.
* **If the teammate is not registered on GetBlock**: Invite them via **email** so they can first create an account before joining the team.

{% tabs %}
{% tab title="The teammate has a GetBlock account" %}

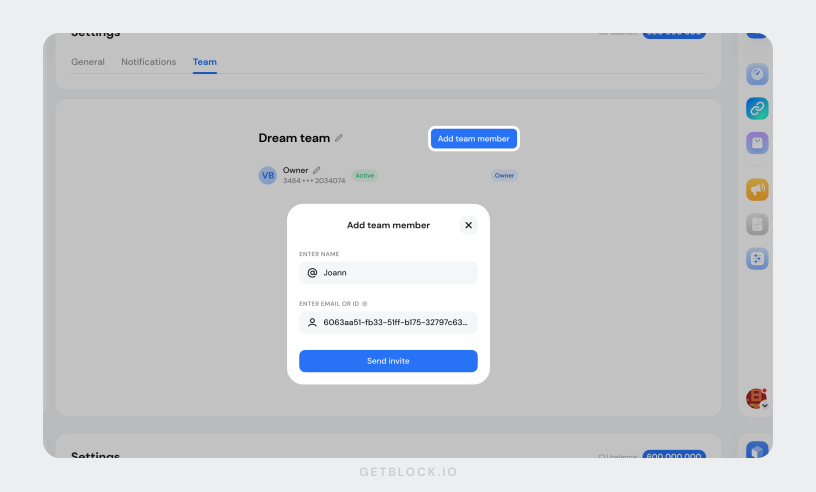
1. Go to **Account Settings > Team**.
2. Click **"Add team member"** in the top-right corner.
3. Request the **User ID** from the teammate (they can find it under **Account Settings** > **General**).
4. Enter the name, User I&#x44;**,** and **send the invite**.

<figure><img src="/files/mcyg6W3JMQtKzaqmwcTb" alt="Adding users to the team account on GetBlock"><figcaption></figcaption></figure>

The user gets a notification and can accept the invite.
{% endtab %}

{% tab title="The teammate is not registered on GetBlock" %}

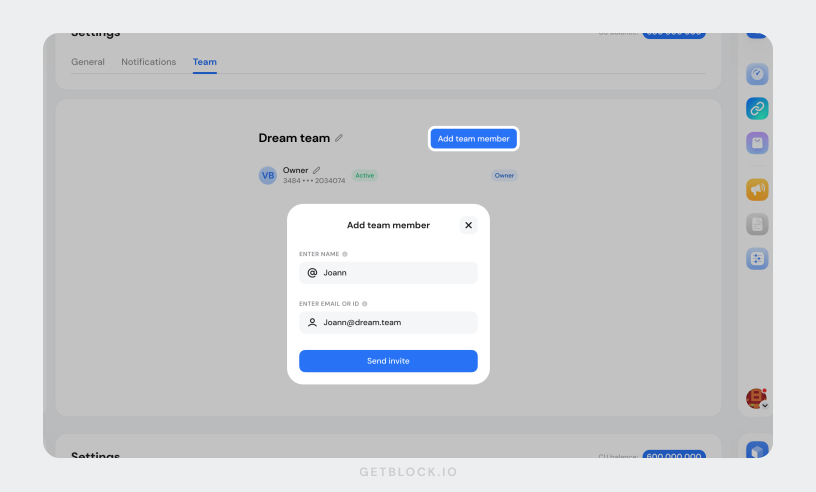
1. Go to **Account Settings > My Team**.
2. Click **"Add team member"** in the top-right corner.
3. Enter the teammate's name and **email address.**
4. Send the invite.

{% hint style="warning" %}
The invite link is valid for 30 minutes. If it expires, please resend an invitation.
{% endhint %}

<figure><img src="/files/F8ScRTmSqXQW7VKacGPk" alt="Inviting teammates to GetBlock&#x27;s team account"><figcaption></figcaption></figure>

The user will receive an invitation email with a link to sign up and join the team.
{% endtab %}
{% endtabs %}

A team member is marked as ![Active](/files/Si6CXUCrAV8zdC9KoIh8) when they have successfully accepted the invitation and joined the team.

If the invitation has been sent but not yet accepted, their status remains ![Pending](/files/oTjPRgnkWTz8GmCy1qyS).

***

### Managing roles & permissions

Once the user has joined, the team owner or an admin can update their permissions:

1. Go to **My Team** in Account Settings.
2. Click the **three-dot menu** (⋮) next to a team member.
3. Select **"Edit access level"**.
4. Assign **permissions**:
   * **Endpoints:** Create and manage node endpoints, access tokens, and view statistics.
   * **Subscriptions & payments:** Handle payments and plans.
   * **Admin:** Includes all the above permissions, plus the access to manage team settings and member roles.
5. Save changes.

<figure><img src="/files/k921inX4pjYzmNVGFB7d" alt="Managing team account user permissions and roles"><figcaption></figcaption></figure>

{% hint style="warning" %}
If a Member has no permissions assigned, they will have **View-Only access** by default.
{% endhint %}

#### **Roles-based permissions**

This table provides a breakdown of actions team account users can perform based on their role.

<table><thead><tr><th width="358.49609375">Action</th><th width="103.0234375" align="center">Owner</th><th width="108.4375" align="center">Admin</th><th align="center">Member</th></tr></thead><tbody><tr><td>Create &#x26; manage access tokens</td><td align="center">✅</td><td align="center">✅</td><td align="center"><a data-footnote-ref href="#user-content-fn-1">🔓</a></td></tr><tr><td>Manage subscriptions &#x26; payments</td><td align="center">✅</td><td align="center">✅</td><td align="center"><a data-footnote-ref href="#user-content-fn-2">🔓</a></td></tr><tr><td>Add &#x26; remove team members</td><td align="center">✅</td><td align="center">✅</td><td align="center">❌</td></tr><tr><td>Edit access levels</td><td align="center">✅</td><td align="center">✅</td><td align="center">❌</td></tr><tr><td>Promote to Admin</td><td align="center">✅</td><td align="center">❌</td><td align="center">❌</td></tr></tbody></table>

{% hint style="success" %}
If you need someone to help manage other team members, be sure to give them **Admin** status.
{% endhint %}

***

### Revoking team access

To remove a user from your team account:

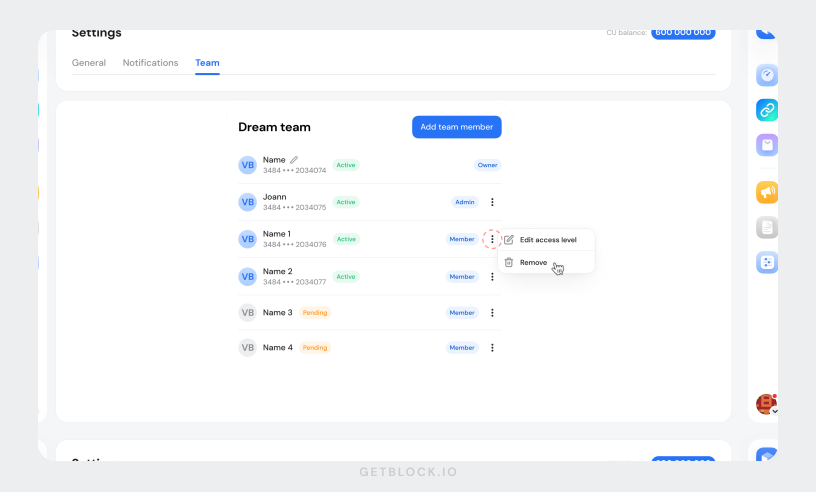
1. Navigate to **Team** in the **Account Settings**.
2. Click the **three-dot menu** (⋮) next to the team member name.
3. Select **"Remove"** from the dropdown menu.

<figure><img src="/files/VvLZWgS5eHy9UDrRydXi" alt="Instructions to remove a team user from the GetBlock team account"><figcaption></figcaption></figure>

{% hint style="success" %}
When removed from a team, users lose access to that team workspace but keep their personal account.
{% endhint %}

***

### How to join a team account

If you’ve been invited to a team on GetBlock, follow these steps to accept the invitation and join the team.

{% tabs %}
{% tab title="Registered on GetBlock" %}
When you have a pending team invitation, a notification badge appears on your account icon <img src="/files/W7VI6Y1VJbrTvuJxdrT5" alt="" data-size="line">.

1. Click your **account icon** to view an invitation.
2. Click **"Accept"** if you're ready to join.
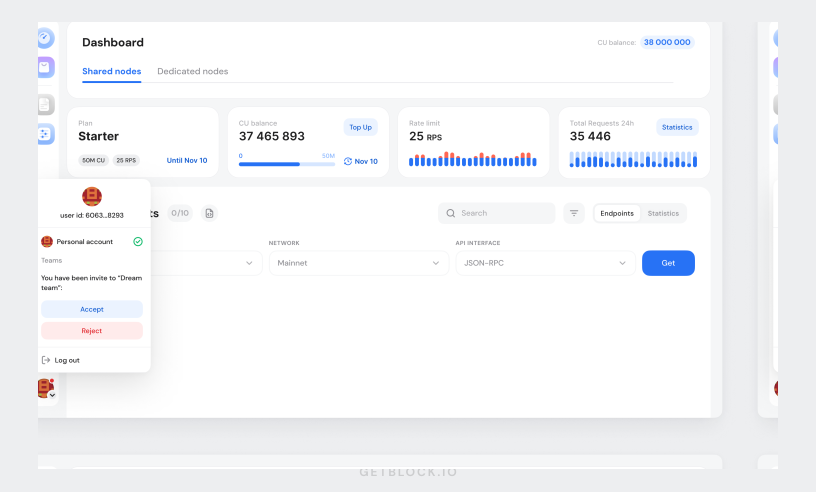
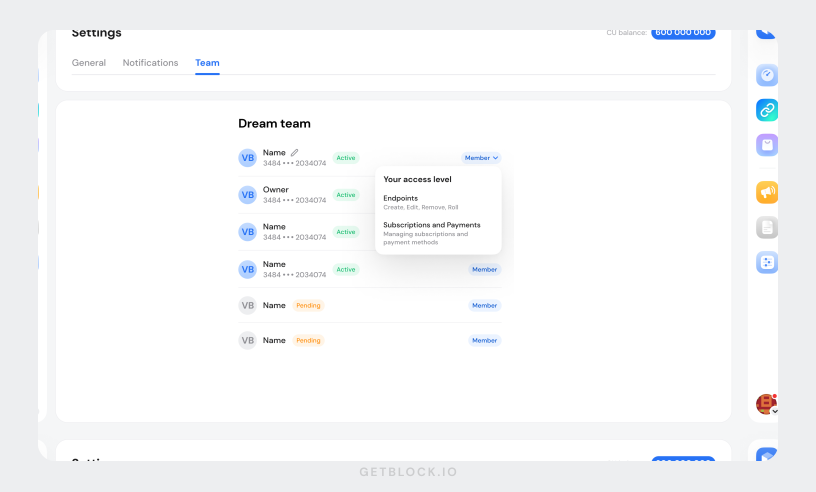
<figure><img src="/files/oWFSGYzrmqL0iuS244DB" alt="How to join a team account on GetBlock"><figcaption></figcaption></figure>

3. After accepting the invitation, you are given access to your team’s workspace. Your [role and permissions](#roles-based-permissions) will be **determined by the team owner or admin**.

<figure><img src="/files/6C8PF9PwpJm92kBcuxEX" alt="Viewing permissions for team account users"><figcaption></figcaption></figure>
{% endtab %}

{% tab title="New to GetBlock" %}
When someone who is not yet registered on GetBlock receives a team invitation, they must first sign up for an account:

1. Check your **inbox** for an email invitation from GetBlock.
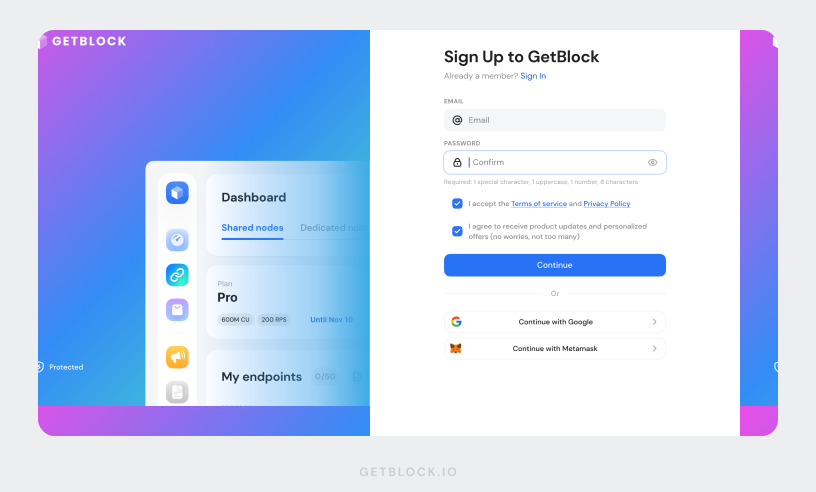
2. Clicking the **invitation link** redirects you to the sign-up page.
3. Create a **secure password** for your new account.
4. Check the boxes to agree to the **Terms of Service and Privacy Policy** and complete the registration.

{% hint style="warning" %}
The invite link is **valid for 30 minutes**. If it expires, ask the team **owner** or **admin** to send a new invitation.
{% endhint %}

<figure><img src="/files/4V61vN8ljFhM8jtrt7IV" alt="GetBlock sign-up page"><figcaption></figcaption></figure>

Once registered, you’ll have your personal GetBlock account. Additionally, you gain access to the team’s dashboard and resources based on [permissions](#roles-based-permissions) given by the team owner or admin.

{% hint style="info" %}
**Next steps: Explore GetBlock**

Now that you’ve joined a team, here are a few useful resources to help you get started:

* [**Getting Started** ](/readme.md)– Learn more about GetBlock.
* [**Managing Endpoints** ](/getting-started/endpoint-setup.md)– How to create and manage node endpoints.
* [**Plans & Limits**](/getting-started/plans-and-limits.md) – Understanding plans and payments.
  {% endhint %}
  {% endtab %}
  {% endtabs %}

***

### **Switching between personal & team accounts**

{% hint style="success" %}
A team user **does not lose** access to their personal account. They can still use and manage their own endpoints and subscriptions.
{% endhint %}

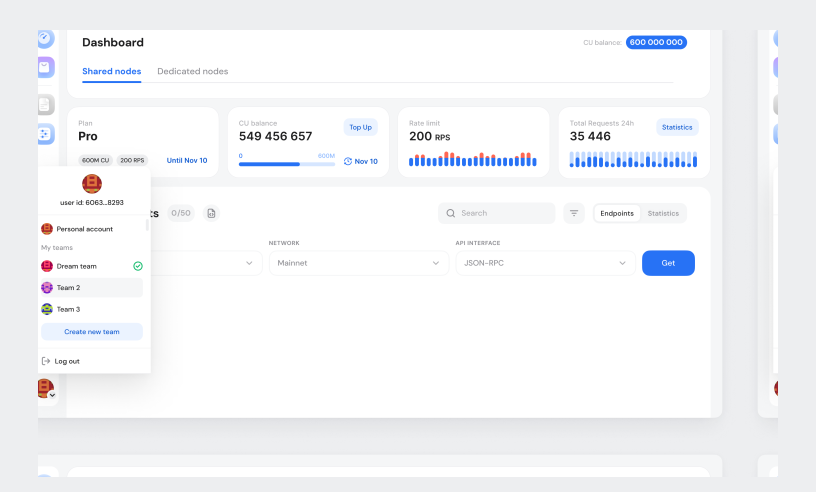
To switch between your personal account and any team accounts you are part of:

* Click the **account icon** in the left panel.
* A dropdown will show all **teams & personal accounts**.
* Switch between them as needed.

<figure><img src="/files/1XLBvWs0ZJXFQq65af5q" alt="Using GetBlock&#x27;s personal and team accounts"><figcaption></figcaption></figure>

The teams list is sorted by recent activity, with the most recently accessed accounts at the top.

***

### **Best practices for team security**

* Regularly review and **audit permissions**. Revoke access for users who are no longer active.
* Grant admin privileges only to **trusted team members**.
* Give Members **only the necessary permissions** (e.g., endpoints access or subscriptions management).
* Never **share login credentials**—use team accounts instead.

***

### **Need help?**

If you run into any issues or have questions, please check out our [FAQ](https://getblock.io/faq/) or visit our [Contact Center](https://getblock.io/contact/). You can also use the **Help** button within your GetBlock dashboard to access support or submit a request.

[^1]: Not enabled by default; must be assigned by an Owner or Admin

[^2]: Not enabled by default, must be assigned by an Owner or Admin


---

# Agent Instructions: Querying This Documentation

If you need additional information that is not directly available in this page, you can query the documentation dynamically by asking a question.

Perform an HTTP GET request on the current page URL with the `ask` query parameter:

```
GET https://docs.getblock.io/getting-started/how-to-set-up-an-account/team-accounts-setup.md?ask=<question>
```

The question should be specific, self-contained, and written in natural language.
The response will contain a direct answer to the question and relevant excerpts and sources from the documentation.

Use this mechanism when the answer is not explicitly present in the current page, you need clarification or additional context, or you want to retrieve related documentation sections.